Territory Management
Definitions
First, here are some definitions to establish the vocabulary.
Geographical Entity
The geographical entity is the base element that form the territories. Could be any dataset present in the application provided it is representing polygons or points.
Territory
A territory is a geographical area formed of a set of geographical entities.
Territory Project
A territory project contains:
- Territory layers that can be based on different geographical entities
- Isochrones serving to generate zones
- Logical conditions used for extraction
General Presentation
Icon: ![]()
The Territory Management tool is a product extension that allows the definition of customized geographical zones (commercial zones, catchment zones, etc.) and the analysis of their content or their distribution.
The uses of this module are several. However two use types are standing out:
- The definition of territories and the repartition of resources: the tool allows the definition of territories allocated to resources, e.g. sales reps, and to automatically quantify the cumulated indicators for each territory. The analyst can modify the zones and the tool calculates automatically the new indicators repartition.
- Zone Analysis: Here the analyst defines one or several zones around a resource, e.g. a catchment zone around a store. The tool allows the analysis these zones content in a few clicks (indicators on the population, data on competition stores, etc.).
The territory layers (a set of geographical entities) available in a project automatically aggregate the indicators that compose them. This allows to permanently know the rates, averages or quantities that are inside (age average, turnover total, etc.).
Who Can Create Territories?
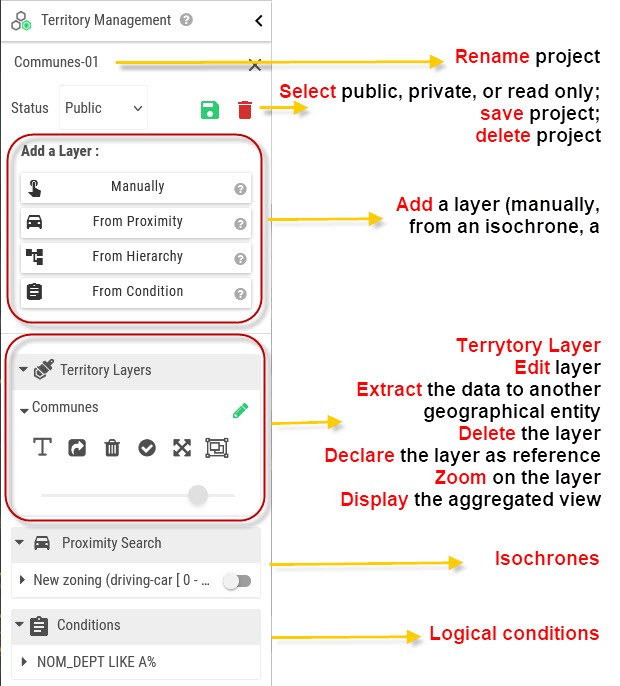
By default, only the users having the role of "designer" can by default create new territory projects, modify or delete them. It is however possible to customize the roles and give this right to all the persons having the role of "territory-author".
The creator of a project can define three possible states:
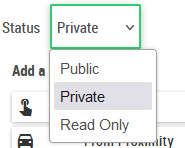
| Status | Commentary |
|---|---|
| Private (by default) | Only the creator of the project has access to it |
| Read Only | Everybody can see the project, however only its creator has the right to modify it |
| Public | Everybody can access the project and all designers have the right to modify it |
Projects Management
The following panel opens when opening the module:
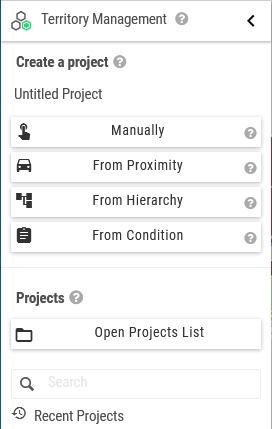
Create a new project
Click on the  button. There are four possibilities available:
Button:  The wizard interface: The wizard interface: 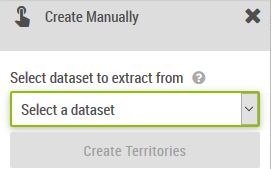 |
The manual creation generates an empty territory layer. The user has to define the geographical entities to be used. |
Button:  The wizard interface: The wizard interface: 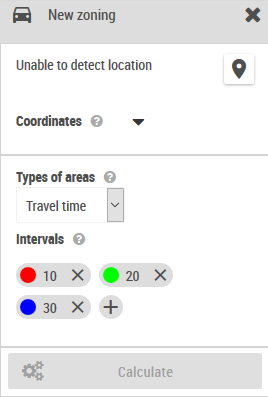 |
The creation from isochronous zones allows the creation of territories from a point chosen by the user (either by specifying the address, the coordinates of a point on the map). The user chooses next a unit (by default minute, kilometers or miles). The intervals define the zones to be calculated according to the chosen unit. E.g.: 10, 20, 30 corresponds to three zones from 0 to 10, from 10 to 20, and from 20 to 30. Finally, the Calculate button displays the zones on the map, and the user has the possibility to select the data that are to be extracted. The configuration page allows the customization of default parameters: - Service Galigeo or choose an ArcGIS Network Analyst server - The list of impedances by default (walk, drive, etc.) - The list of zones by default and their colour |
Button:  The wizard interface: The wizard interface: 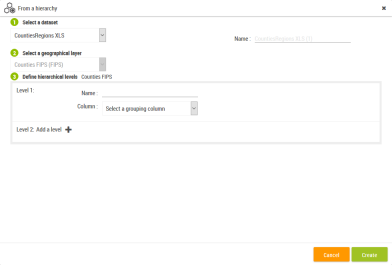 |
The creation of a project from a field allows the automatic construction of a territory layer by choosing an aggregation field. For instance, the selection of a layer Counties with the field State will create a territory by state. Every territory will contain a set of counties. |
Button:  The wizard interface: The wizard interface: 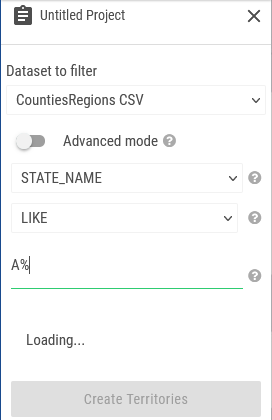 |
The creation of a project from a condition (query) allows the creation of a territory composed of entities fulfilling a particular condition. By default, a condition is composed from a field, an operator and a value. E.g.: "Population > 200000". An advanced mode allows the definition of more complex condition by entering them manually. |
Open an existing project/Delete an existing projects
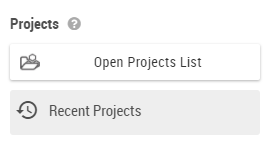
The user can open an existing project either by clicking on it directly in the Recent Projects list of from the button "Open Projects List".
Project Main View
Create/Edit Territories
The territories are configurable areas in which the designers can quickly add/remove geographical entities using the available tools.
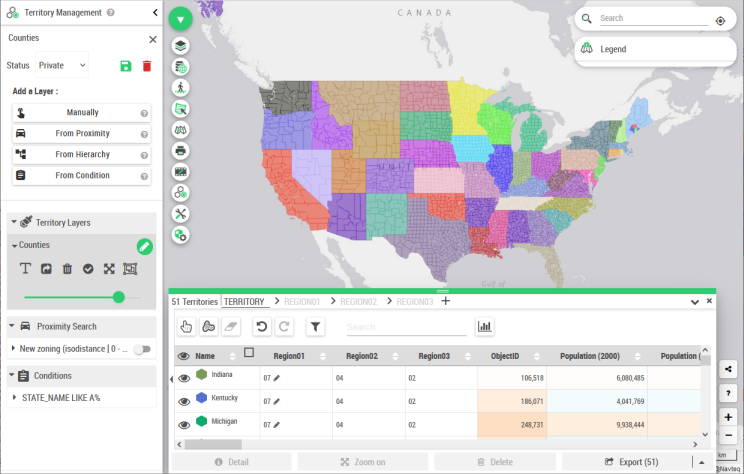
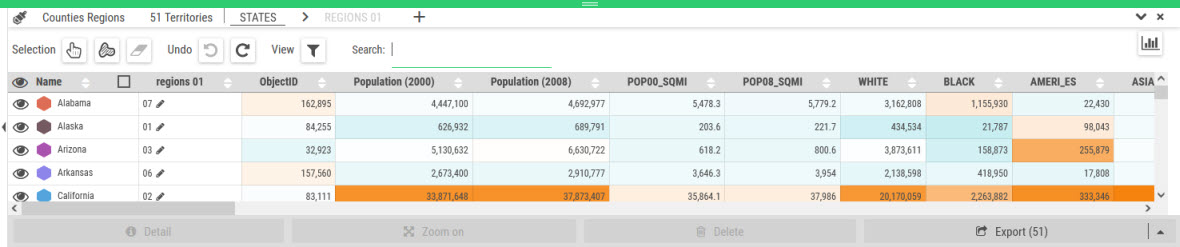
The table
By default the table represents the territories and their calculated indicators. The indicator columns are coloured in order to stress the dispersion of the values between different territories. For a given column, the more vary the colours from light to dark, the more the repartition of indicators is disparate. The values are calculated using the aggregation operator defined at the level of the data set in the tab Data Configuration in the Data Editor. In order to know this operator, one has to open the Data Configuration tab from the Data panel for the corresponding geographic entity.
Create territories
If your project is a "virgin" one, start by creating your territories.
Selection buttons: 
Choose a selection tool: pointer, free hand or delete the selection.
The pointer can be used for selecting or deselecting an entity.
To delete a selection, use the gum: ![]()
The creation button: 
Once your selection is finished, click on the + button in the toast at the upper side of the screen to create the territory. A dialog with two choices is displayed only if the selection has geounits that belong to an already existing territory:
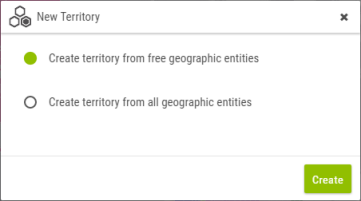
- Create a territory from free geographic entities
- Create a territory from all geographic entities
Once created, the territory is visible on the map as well as in the table. A default color is also assigned.
Icon: ![]()
Once your selection is finished, click on the + button in the toast at the upper side of the screen to create the territory. A dialog with two choices is displayed only if the selection has geounits that belong to an already existing territory.
Undo previously performed operations
Previously performed operations (addition/subtraction of geounits to/from existing territories or not yet allocated geounits) can be undone or redone using the two buttons available:  . The operations will be treated first come first serve.
Assign new geographic entities to a territory using the map
One can add new geographic entities to a territory by drag and drop a selection on a target territory. Note: if the geographic entities belong to another territory, they will be removed from this one to be added to the target territory.
Merge territories
In order to merge a territory to another, select a territory by clicking it, then drag and drop it on the target territory.
Warning: In order to be able to do a drag and drop, first the selection tool has to be deactivated.
Rename a territory

Click on the label of a territory in the table, enter the new name and then confirm the choice by clicking on the check button at the right.
Change the color of a territory
Icon: ![]()
Click on the hexagon at the left side of the label in the table and, using the colour selector, choose the desired colour.
Delete, zoom, export one or more territories or geounits via the action bar

Select the territories in the table using the CTRL key then click on the action button at the bottom action bar.
There are three possibilities available for export: shape, CSV or catalog.
Display the geographic entities that compose one or more territories
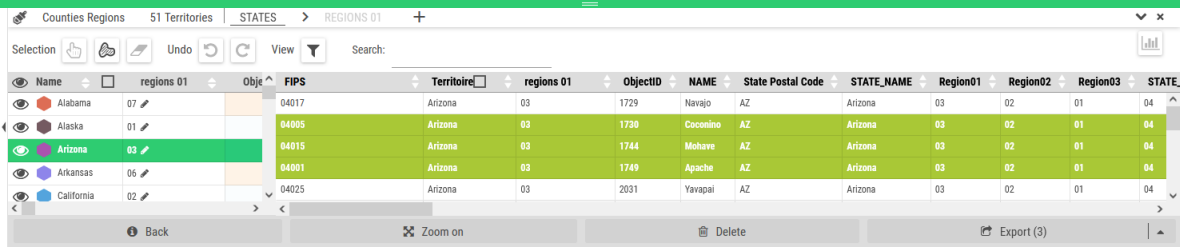
Select the territories of which it is desired to display the geographic entities using the CTRL key, and then click on the Detail button from the bottom action bar.
In order to delete, zoom or export geounits it is enough to select them in the table using the CTRL key and then click on the desired action button below.
Filter a table

The Search tool allows the filtering of the table and the map according to the entered text.
The "View" once activated, will filter the map and the table according to the extent.
Hierarchies Management
A project is done on a geographical level. This level is called generically "Territory". The designer can add several hierarchical levels. These superior levels are grouping of the n-1 level.
Let's take the example of an enterprise with 3 hierarchical in the management of sales territories.
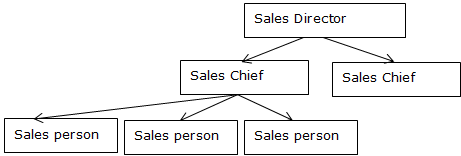
The "Territory" level will represent the zones managed by sales persons.
The 2nd level will represent the zones manage by the Sales Chiefs, zones created by aggregating the first zones.
The 3rd level will represent the zones managed by the Sales Directors, zones created by aggregating those of the Sales Chiefs.
Display a level
In order to display a level it is enough to click on the name. The table as well as the map will be updated. The current level is darker and is underlined.
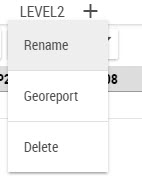
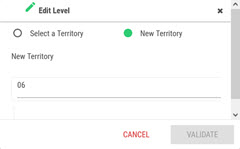
Rename a level
One can rename a level by selecting "Rename" in the drop-down list that is displayed when hovering with the mouse on the Edit icon. A dialog window will open. Enter the name and then confirm. The first level cannot be renamed.
Delete the last level
One can delete the last level of the hierarchy by selecting "Delete" from the drop-down list, and confirming the deletion. The first level cannot be deleted.
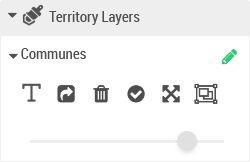
Edit the superior level from the table
It is possible to edit the superior level of a territory from the table. By clicking on the pencil at the right side of the name of a level 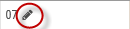 , a dialog box will open offering the possibility to assign a territory:
- to an existing level,
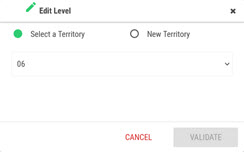
- or to create a new territory on a superior level
Reference Layer
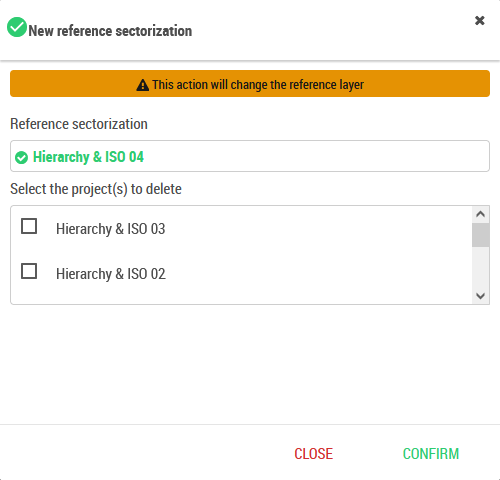
It is possible to define a territory layer like a reference layer. It is possible to have only one reference layer for a map.
This feature helps promote a sectorization as the reference.
The advantage of being able to define a reference layer occurs in the case of a sectorization. Here, the reference layer represents the official sectorization.
An operator can build hypotheses through territorial projects. When a hypothesis is validated, it is then sufficient to define it as the new reference. The map will then update automatically with the new division.
Define the Reference Layer
From the section "Territory Layers" the button  allows you to set the layer as the reference.
If the map already contains a reference layer, a window opens prompting the user to clean up old projects.
Using the Reference Layer on the Map
The reference layer is automatically available from the data panel in the territories section (if it exists). There is one dataset per level: from the geounit level to the last level of the hierarchy. This allows you to use territory information directly on the map:
- In layers
- In filters
- In reports
When promoting a new reference layer, the different datasets are automatically updated.
Add georeports to a level (only in Galigeo Enterprise)
One can associate georeports of the map to a level of the hierarchy. Select "Georeport" from the drop-down list, choose a georeport from the list, and click on Add. In order to delete a georeport, click on the recycling bin. Save.
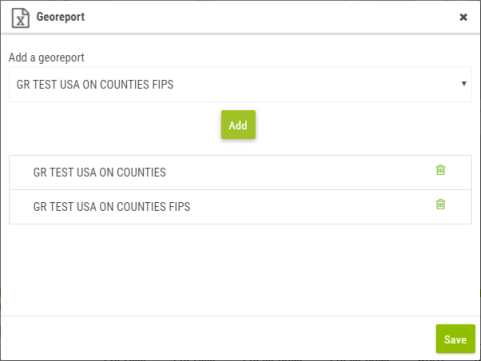
When at least one georeport is associated to a level, a new icon appears. ![]()
By hovering over it, a drop-down list is displayed. Click on a georeport to open it.