Chapter 7: Extension Modules
Street View
Icon: ![]()
Visual presentation:

The Street View function allows the access to the Google Street View directly from the application.
1. Click on the Street View icon in the menu 2. Choose a point on the map 3. A Google Street View window opens in the lower right corner of the map, and the navigation becomes then possible inside this window
The use of the Street View functionality uses the Google Street View application provided by Google. Its use has to respect the terms and conditions defined by Google.
The feature cannot be used w/o a key. In order to define a key, the file <GALIGEO_HOME>/config/config.json needs to be modified.
And enter the Google key here:
"streetView": {
        "ApiKey": ""
      }
The instructions to create a key are described here:
https://www.wpgmaps.com/documentation/creating-a-google-maps-api-key/
In order to have the Street view menu available in the application, the following lines must be added into the file <GALIGEO_HOME>/config/config.json at the "panels" node:
{
    "name" : "streetView",
    "html" : "block/panel-streetView.html",
    "js" : "js/panel-streetView.js",
    "container" : "left-menu",
    "class" : "GGOUI.StreetView"
  }
OAuth2 Authentication from Salesforce
It is possible to authenticate oneself in Galigeo using a Salesforce account. When this configuration is set up, the users will not need to authenticate themselves in Galigeo. There are two cases when entering the Galigeo URL in a browser:
- The user is not logged into Salesforce, then the Salesforce login screen appears.
- The user is already logged into the Salesforce account and can enter Galigeo directly.
The OAuth2 setup offers several advantages:
- As mentioned above, the user administers only one account
- The administrators control the Galigeo access from Salesforce
- It is possible to access the Salesforce data in Galigeo in the form of SOQL queries.
Configuration in Salesforce
On the Salesforce site, the configuration of the OAuth2 involves the creation of a connected application.
Link to the Salesforce documentation: https://help.salesforce.com/articleView?id=connected_app_create.htm&type=5
- In Settings, enter
Applicationsin the Quick Search field, and then select Applications Administrator. - Click on New Connected Application.
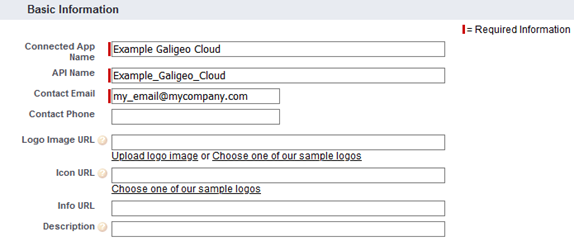
- In the section Basic Information specify the three mandatory pieces of information in order to describe your application: a. Connected App Name b. API Name: click on the TAB key in order to have it entered automatically according to the app name. This identifier has to be unique. c. Contact Email address
The information afterwards is optional.
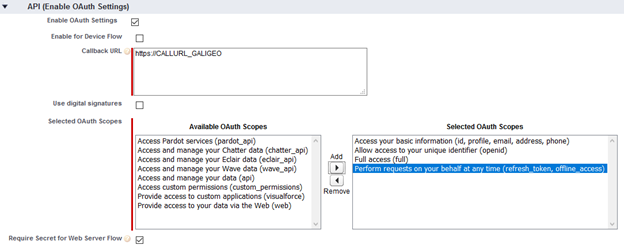
- In the API section (Enable OAuth Settings) a. Check the box "Enable OAuth Settings" b. Enter the calling URL provided by Galigeo for your organization (see following section) c. Enter the OAuth scopes
- Save a. Click on "Save", and then "Continue"
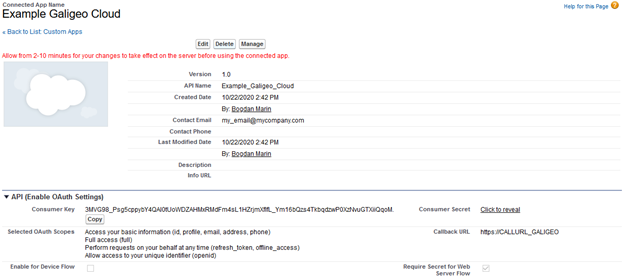
- Copy the values "Consumer Key" and "Consumer Secret" to continue.
Configuration in Galigeo
- From the Administration, access the tab
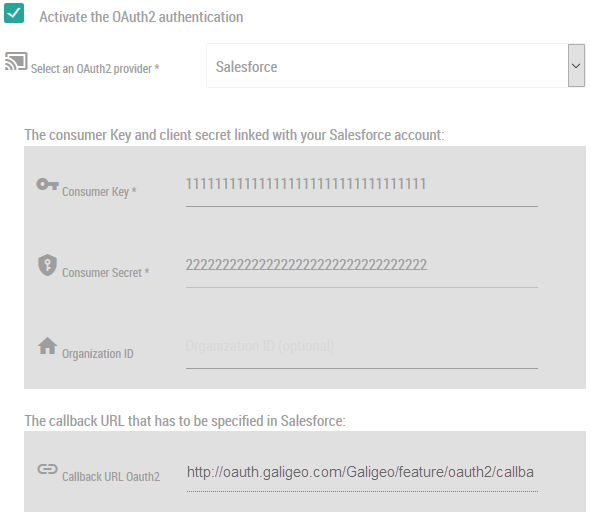
- Check the Activate OAuth2 case
- Choose the provider type between Salesforce or Salesforce Sandbox according of the organization type used
- Enter the values "Consumer Key" and "Consumer Secret" that were previously obtained
- Optionally enter the Salesforce organization ID in order to impede the users coming from other Salesforce organization to access Galigeo
- Save
The callback URL is provided in the Salesforce configuration (see previous section).
Access Methods
When OAuth2 is configured for an organization, a button "Login with Salesforce" appears on the login page.

In order for the button to appear it is necessary to specify in the login page the organization to which it is desired to connect.
For this there are two methods:
1/ Access Galigeo (thus the login page) using a domain where the name corresponds to the organization ID. E.g.:
https://myorganisation.galigeo.com/Galigeo/viewer/login.html
2/ The organization ID can also be specified in the URL. E.g.:
https://<SERVER_URL>/Galigeo/viewer/login.html?orgId=myorganisation
This constraint only affects access to the login page if the user is not already logged in. Once connected, the connexion it is done automatically.
Access to the Salesforce Data from Galigeo
When a user is connected to Galigeo from a Salesforce account, this gives automatically access to "Salesforce" data from the SQL Queries (warning, here it is to be used the SOQL language, proper to Salesforce).
It is then possible for the authors to define SOQL queries associated to a map and use these queries for the layers, filters, TM projects, reports, etc. in the same way as the SQL queries.
Every user (advanced user or not) accesses the Salesforce data from the own account. If there are data restrictions in place in Salesforce, then the same restrictions apply in Galigeo.
For instance, if a sales associate accesses only the data for the own territory in Salesforce, then he will access automatically the same perimeter in Galigeo.
OAuth2 Authentication from Microsoft Azure
Microsoft Azure Configuration
This section describes the configuration for declaring a Galigeo application in Azure. This application will be used as OAuth2 connection point.
Step 1: From the Azure portal (portal.azure.com), go to the "App Registrations" section.
Step 2: Click on "New Inscription". On this screen we enter an application name as well as the Microsoft accounts types that will access the application.
Step 3: From the "Authentication" menu enter the redirection URL. This URL is acquired from the OAuth2 tab of the Administration.
Ex.: https://organisation.galigeo.com/Galigeo/feature/oauth2/callback/organisation
Step 4: From the "API Permissions" menu, add the following rights of delegated type:
- Microsoft Graph > profile
- Microsoft Graph > User.Read
Step 5: From the "Certificates and Secrets", generate a secret key. Note, remember to copy the key value at the moment of its creation, because it is no longer possible to acquire it afterwards.
Galigeo Configuration
From the OAuth2 of the Administration, enter the Consumer key and secret.
- The consumer key corresponds to the application ID displayed on the welcome page of the newly created application.
- The consumer secret corresponds to that created in the previous section.